
 Based in Melbourne
 Discrete Shipping
 2000+ Products
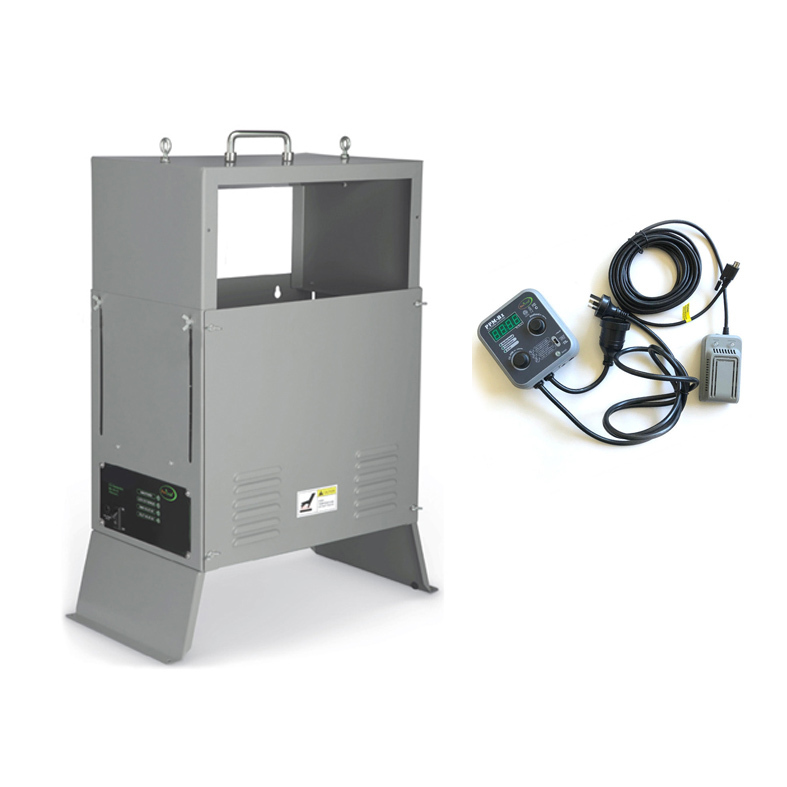

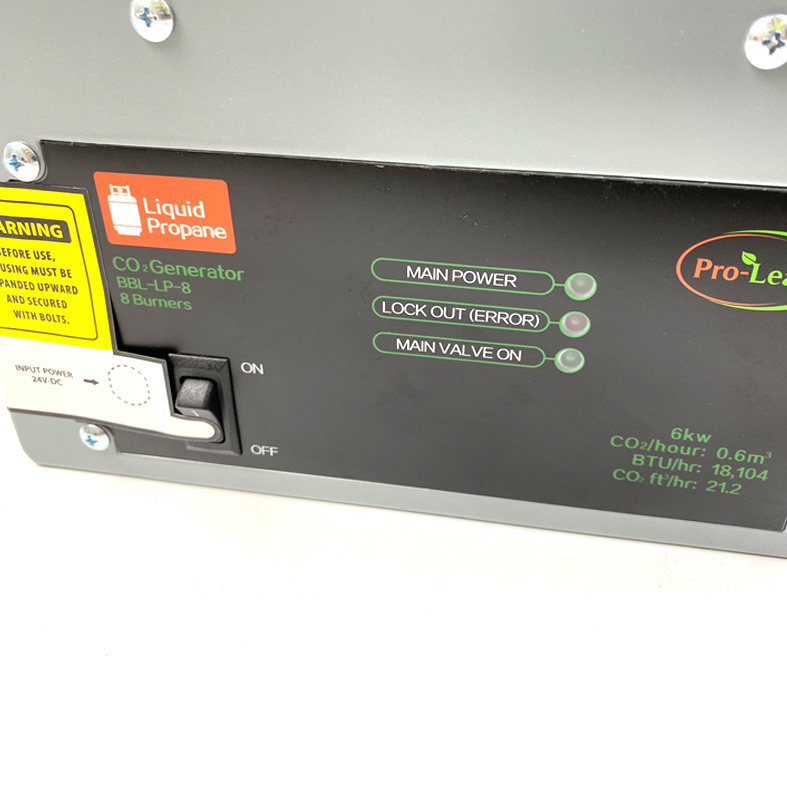

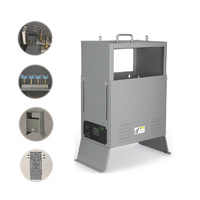
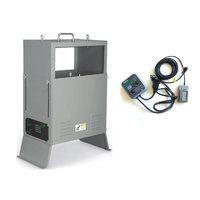
CO2 Carbon Dioxide Generator Propane 8 BURNERS WITH PPM controller
Co2 8 burner -Gas
#SKU: CO2_8
#Brand: Proleaf
Accelerate Plant Growth & Produce More Fruits!
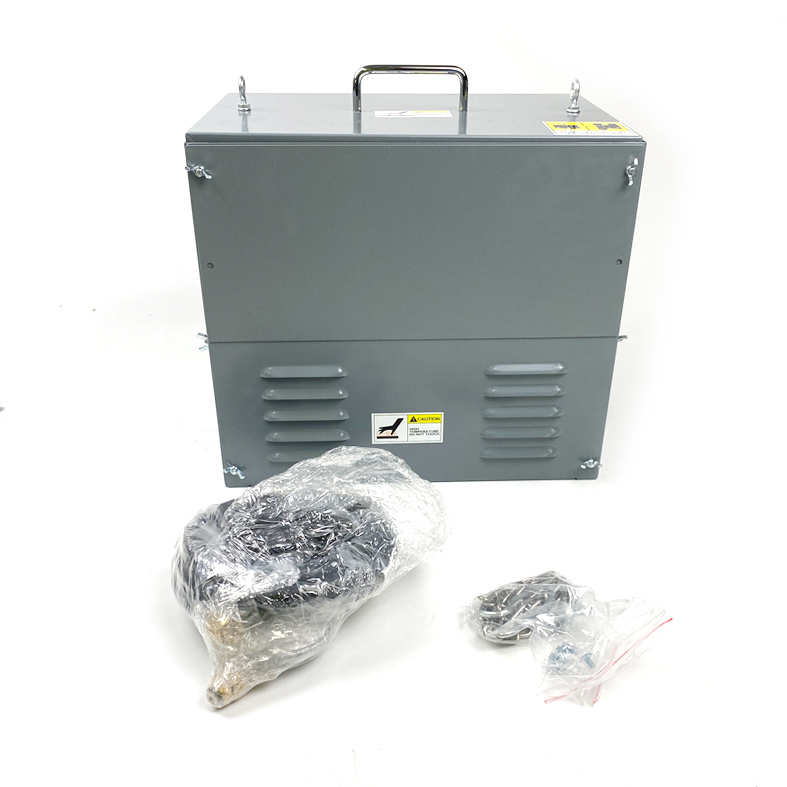
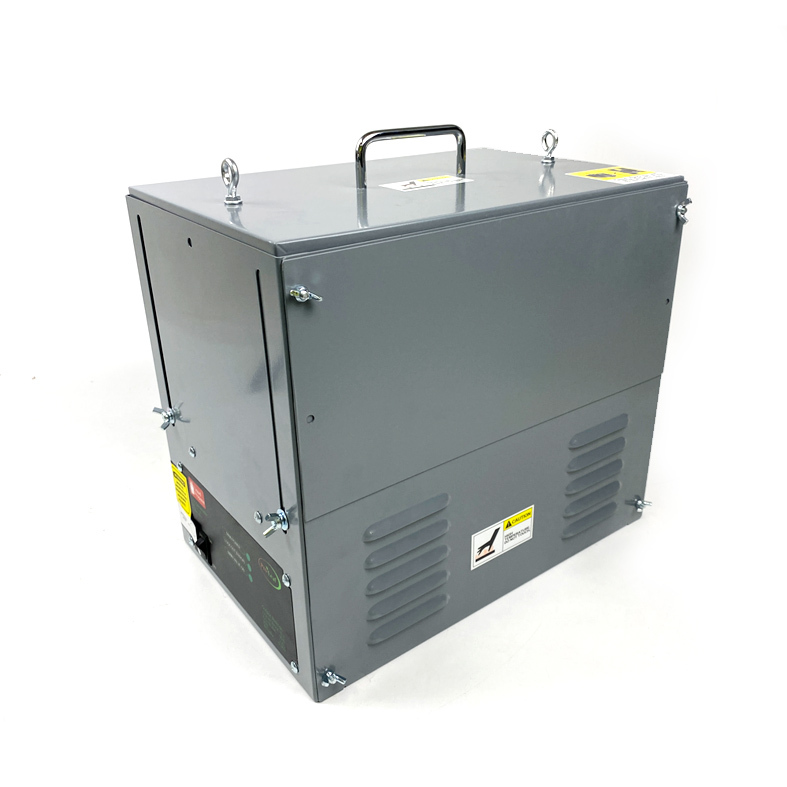
Carbon Dioxide (CO2) is one of the easiest ways to accelerate plant growth. Plants grown with supplemental CO2 can produce up to 40% more flowers or fruit. A CO2 generator is the most cost effective way to add CO2 to your environment. Many greenhouses use CO2 generators to boost CO2 levels safely and economically. With new technology our manufacturer has developed some of the safest and most reliable CO2 Generators. The CO2 generator with 8 burners is recommended for small to medium size areas up to 9 x 9m. The features a Pilotless Electronic Ignition, instead of the traditional "pilot light". It also comes with a standard "tip-over" switch will shut down the fuel to the main burner in the event the unit falls or tips over.
Please Read All Details Stated below Before Initial Use.
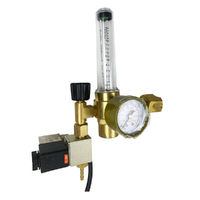
CO2 Regulator:
All the inner design of generator is the same except exclusive burners. Choose correct regulator, hose, gas supply for burners.
This regulator supplied with unit will regulate gas pressure to 11”WC or 1/2 PSI before gas constantly flow into unit. It is critical to install the regulator supplied “in-line” between your gas supply and the generator.
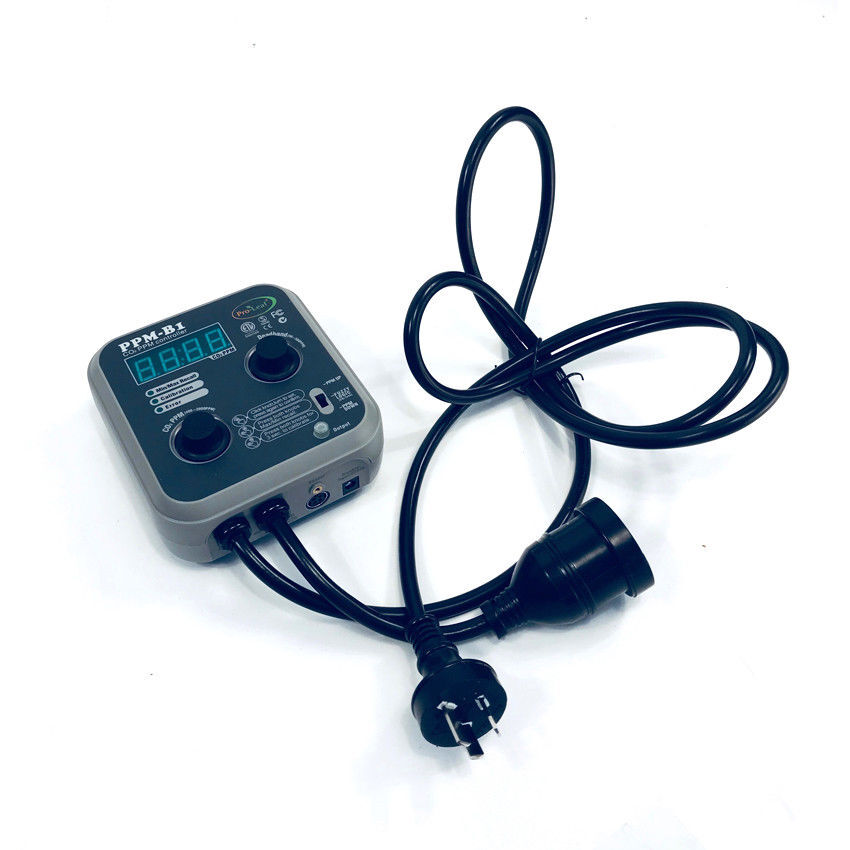
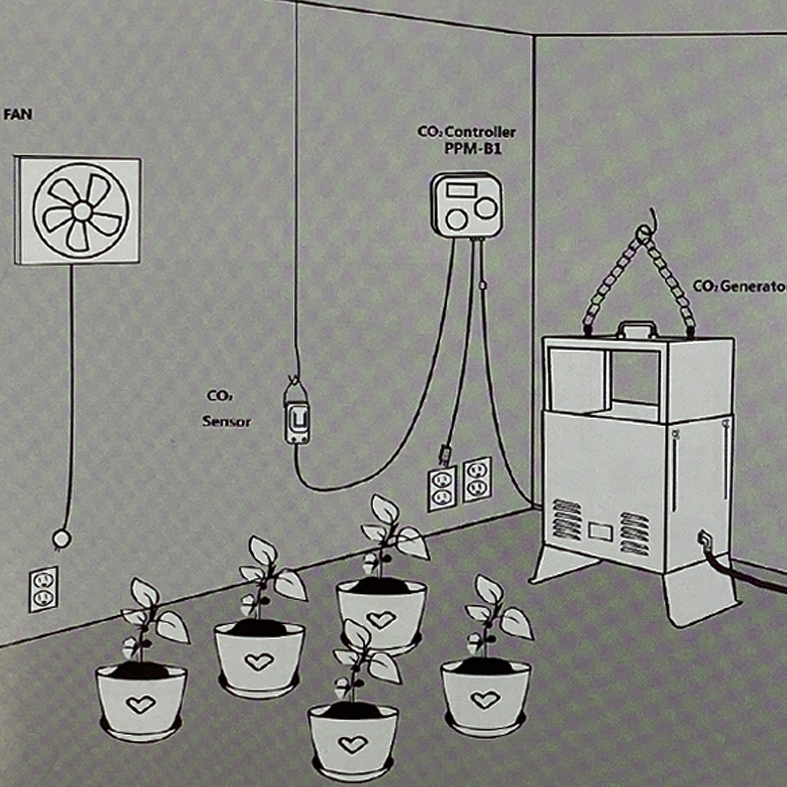
PPM Controller (separated from Burner):
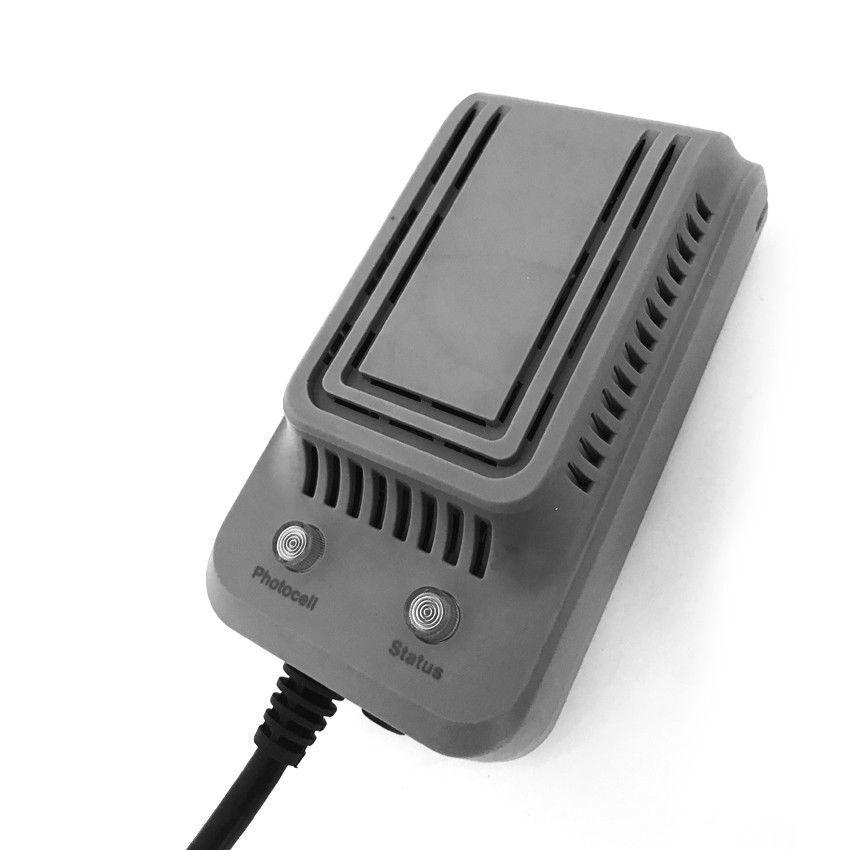
An extremely accurate NDIR CO2 PPM sensor (part-per-million meter) is combined with a digital microprocessor to create an accurate and simple method to control supplemental CO2 use in a greenhouse. The unit can control CO2 levels up to 2500PPM. The user selects the desired CO2 level to be maintained.
A built-in photocell automatically activates the unit only during the DAY. The user can also select their desired “Dead-band” setting depending on how accurately they want to control their PPM level. A pair of LEDs on the front face of the unit allows the user to quickly verify the ACTUALCO2 level +/- 50 PPM simply by counting the number of times the lights flash on and off. The “plug-box” unit is plugged into a standard power outlet, then the user connects any CO2 regulator or CO2 generator to the CARBON-B1 PPM controller . Once powered up and connected, the CARBON-B1 will automatically keep the CO2 at the preset level. The unit can also be easily re-calibrated by the user to ensure proper operation. Unit rated at 10 amps @ 240vac 50/60hz.
Installation:
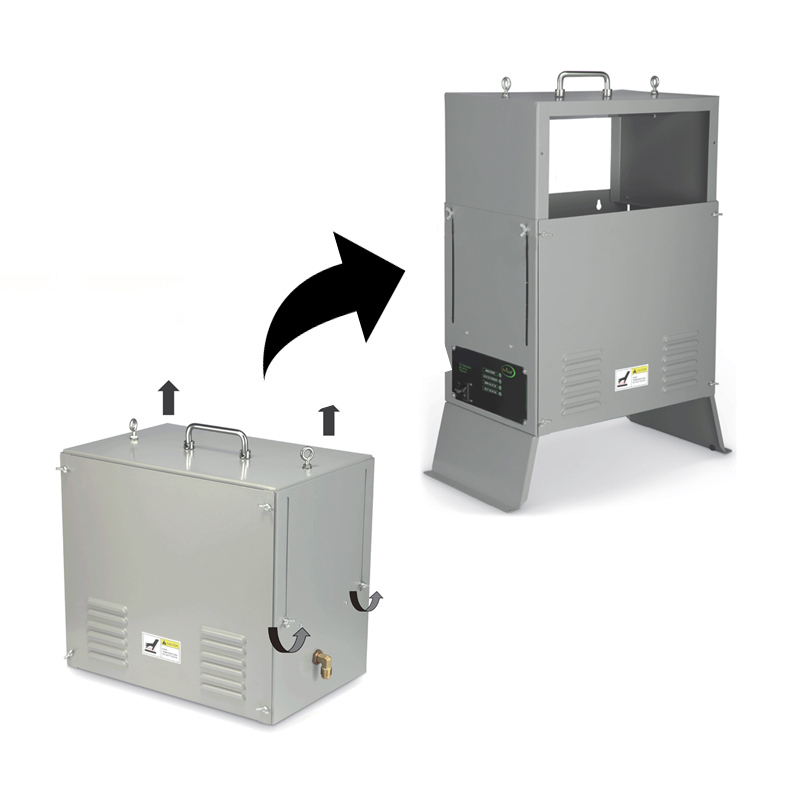
- Remove front panel with loosening up 4 screws.
- Find tip over safety switch (like a pendulum) and remove PE foam. IMPORTANT: CO2 generator doesn’t work if ignore this step.
- Assemble back front panel.
- Determine the desired location for generator. It must be positioned at least 20” away from ceiling and wall. Don’t put any flammable materials around.
- Hang the unit to suitable supports by using chain and hook supplied with unit. The unit must be level in order to operate correctly and safely. (Tips: If the unit is tilted more than 45 degrees in any direction, safety switch will cut off DC power, solenoid valve and ignition control module will stop working.)
- Attach power adapter to DC power of unit and plug it into the wall or your controllers (Note: In order to reduce waste, use your generator during daylight hours. Monitor/Controller/Timer will be necessary). Turn on green switch (indicator is on), observe electric spark comes out of ESI, connections well, turn off switch.
- As schematic diagram of regulator, connect CO2 generator, regulator and gas supply. The hose supplied with the generator is fitted with a standard 3/8” female flare connection. Connect the gas hose to gas inlet. To connect the hose, properly tighten the connection with two wrenches. For Liquid Propane Regulator, please install it to the propane tank directly. For Natural Gas Regulator, please use the short hose to connect regulator and natural gas supply. Only use regulator and hose supplied with unit. Make sure gas supply valve was shut off before installation.
- Open gas supply valve and inspect leaks by using a spray bottle with soapy water, bubbles indicate where leaks are. Tighten fittings and recheck.
- Make sure all the connections well, then open the valve of gas supply, turn on the ignition switch( green switch), RH propane generator will now activate. NOTE: For the first time using, unit will attempt to light within 10~12 seconds. If failed, ignition module will beep. Turn off ignition switch and back on. It will purge air out of the line and continue the ignition sequence.
Trouble Shooting with Failure Ignition:
Make sure turn off ignition switch, shut off valve of gas supply, plug out power adapter. Check as followings:
- If remove PE foam wrapped at safety switch.
- If hang unit in level.
- If top of safety switch fully touch panel.
- If power adapter is broken.
- If ground wire of ignition module is attached well to solenoid valve.
- If the flame is fluctuated, regulator might be broken. Call technicians to mend.
Warnings:
- Make sure hang unit in level and hanging supports is strong enough. Be far away any potential flammable materials.
- Do not touch the outer enclosure, especially the top of the unit. It gets hot when operating.
- When CO2 generator is NOT in use, place in sealed bag.
- Do not put paperclips, tools, etc. into unit. Possible electrocution may occur.
- Operate CO2 generator in well ventilated area. Low level of oxygen in burning will produce carbon monoxide. PPM controller is highly recommended. CO2 level for optimum growth is between 1000 to 1500 PPM. Above that is usually considered wasteful. Above 5000PPM is considered dangerous to animals and humans. Side effects of excessive CO2 include headaches and drowsiness. Use a PPM controller to ensure you are maintaining the proper PPM level.
- Make sure to verify your power source prior to plugging CO2 generator into outlet.
- Check all equipment that will activate this CO2 generator is the proper voltage.
- Do not use LP CO2 generator with Natural gas or alternately NG CO2 generator with liquid propane. Make sure the fuel supply matches your generator type!
- When smell gas, please immediately close valve of gas supply and do not turn on any electrical devices. Ventilate the space by opening vents/doors/windows. Then look for leaks and fix.
- Do not alter or modify this unit in any way except burners. Each burner installed adds approximately 3 cubic feet of CO2 per hour. NOTE: Operate the GENERATOR at altitudes lower than 2800 ft above sea level. For use in higher altitudes, please contact factory for special brass burners.
Specifications:
- Model: LP-8
- Fuel: Liquid Propane
- Inlet Pressure Of Regulator: 25~250 PSIG
- Outlet Pressure Of Regulator: 280mmH2O (11″W.C.)
- Flow Capacity of Regulator: 71400BTU/hr
- Using Space(cft): >3200
- Co2/Hour: 0.6
- Producing CO2 (cft/h): 21.2
- BTU Rating/hour:18104
- Dimension Of Unit (mm): 420×215×420
- Weight Of Unit (kg): 9.15
- Power Adapter: 100~240VAC(Input), 12VDC 1.25A(Output)
- Ignition Way: Electronic Spark Ignition
Package:
1 x Co2 Generator with 8 Burners
1 x PPM Controller
| SKU | CO2_8 |
| Barcode # | 880922936164 |
| Brand | Proleaf |
| Shipping Weight | 11.0000kg |
Be The First To Review This Product!
Help other Melbourne Hydro users shop smarter by writing reviews for products you have purchased.


